How To Make A Paper

Updated June 14, 2023
CollegeChoice.net is an advertising-supported site. Featured or trusted partner programs and all school search, finder, or match results are for schools that compensate us. This compensation does not influence our school rankings, resource guides, or other editorially-independent information published on this site.
Turn Your Dreams Into Reality
Take our quiz and we'll do the homework for you! Compare your school matches and apply to your top choice today.
A Step-by-Step Guide to Save Time and Energy
With all the things you have going on as a student, writing a paper can seem like a daunting task. Many students opt to put off that daunting task, which ultimately leads to bad grades on papers that would otherwise have been easy A's. On top of that, papers often make up a large portion of a student's overall grade in any class, which makes them even higher risk ventures.
Here, we'll walk you through the most important aspects of making a paper, from beginning to end so you won't have to whip up a paper in an afternoon, plagiarize, or neglect to do the assignment.
This image and list-based, step-by-step tutorial is the closest thing to writing a plug and chug paper you can get. In this tutorial you'll learn:
- Techniques to clearly understanding assignments and what professors want to see in your writing
- Techniques for managing your time while you work on a long term research paper or short term writing assignment
- Approaches to generating solid topic ideas that will make your paper interesting and engaging
- Tips for crafting a strong thesis statement that can be sustained throughout the whole of a long assignment
- Tips for crafting transitions between ideas, sentences and paragraphs
- Techniques for revising and editing your paper before you hand it in
So, are you ready to ace this paper of yours? Get out some paper and a pencil and let's get started!
How do I Know What My Professor is Looking for?
The answer to this question is easy: look at the materials the prof gives you. But, it’s important to get started the exact same day that the prof hands you the assignment, and it will only take 30 minutes. There’s no time to waste.
Let’s deal with the first one right now: Looking at what the prof wants you to do.
1. Write to the Rubric
The first important step in writing a paper is taking some time to understand what the professor is looking for. If you know that, you can write to the rubric and pick up easy points along the way.
Universities mandate that professors given students rubrics or some form of assessment guideline. Remember, the rubric for the course on the assignment sheet you’ve been given, you will find a general rubric in the class syllabus, or the professor will include a rubric with an assignment sheet.
If the professor does not provide these things to you, don’t be afraid to ask for them. It’s completely unfair to assess a student if the student doesn’t know what’s expected of them. When you ask, be courteous.
2. Begin with the End in Mind
Once you have that rubric and assignment sheet in hand, you’re ready to discern the things your prof will look for when grading the assignment. This means you can begin with the end in mind, crafting the paper around what you know the prof wants to see. To begin with the end in mind, you need to follow three simple steps:
– Look at the Assignment With a Critical Eye
Take a few moments to review the assignment and rubric with a pen and highlighter, making notes and underlining key elements the prof wants to see.
– Write an Anchor Sentence
Once you know what the prof wants, you can write a one sentence reference that you can refer to whenever you feel like you’re going off course.
– Assess your Gaps
Make a list of three strengths and weaknesses you have as a writer. Be mindful of the pitfalls and confident about your high points.
All this should take you no more than 10 or 15 minutes. It may seem counter-intuitive, but using time to get organized saves you time later, and makes the writing process so much simpler. So, here it is, step-by-step:
3. Look at the Assignment Critically
Now, let’s take a look at a sample assignment. Say you have to write a paper for your Linguistics class. Take a look at this assignment from an actual college professor:
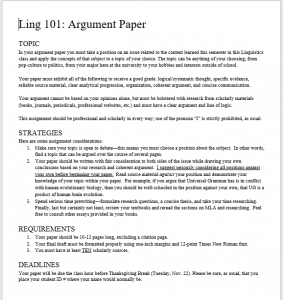
Yow! Even with bullets and commands that’s a lot of text. Let’s take it section by section, one directive at a time.
First, let’s start with the macro. Go through and find the concepts the prof wants you to cover in the paper.
This prof is doing what profs do: pontificating. Lord love ‘em, but professors are notorious for giving more information than necessary or saying more than what needs saying, so do your best to boil the assignment down to the essentials with your highlighter:
Take note, these macro concepts are often suggestions, not commands. They are the prof telling you how to be impressive, clear, or to raise your grade through a demonstration of your wits and knowledge.
Your profs know when you don’t take time prewriting, and they know when you’re being wishy-washy or only reading to reinforce your opinion. This is your prof letting you know that.
Second, go micro. Go through and underline actionable items. These are the items that must be included in the paper for you to get a good grade. Usually they are very specific:
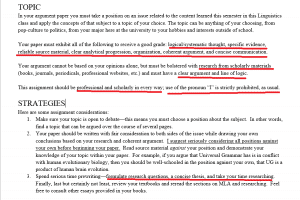
Clearly, if your paper uses first-person pronouns, it will irk the person giving you the grade—probably best to stay away from that. Also, you should be using scholarly research, which means no random Googling and picking the first things you ping.
Take a look at the first section of the assignment sheet. See where the prof tells you exactly what your paper should be?
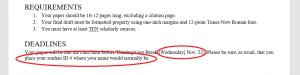
Also, take a look at the section at the “Requirements” section. This paper better be formatted in a particular way!
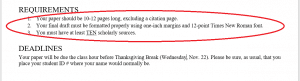
Also, watch for specific requests about format changes and due dates. Circle them!
These are no-nonsense statements/compromises that the prof needs you to abide.
Why would a prof do this? Well, the answer is simple. Your profs aren’t trying to bust your chops (they do, in fact, have other things to do than make you miserable)—they’re trying to streamline the grading process. Imagine you have 75 papers to grade written by your 75 students.
Imagine just how much variation and diversity would occur between those 75 people and their papers if the prof left it all to chance—all of these students like different fonts, would cite things differently based on their preferences, and would hand in widely varied papers, at least doubling the time it would take to read those papers.
So, don’t you want to help that prof out? Make that prof love you by following these directions. If you follow the directions, this prof will direct their ire elsewhere.
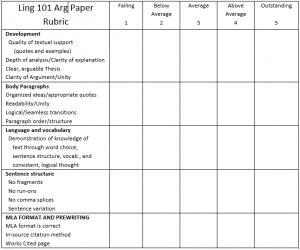
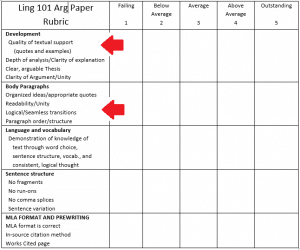
Now that you understand why profs are such format sticklers, take a look at the rubric:
The rubric is a list of direct touch points that will be examined by the professor as they grade your work. Take note, they’re specific and they break down your potential performance. In this case, you can see five discrete categories, each with its own stakes, and the number value that corresponds to your performance:
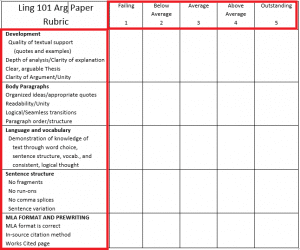
The prof will take the rubric and keep it within reach while grading. Along with making notes on your paper, the prof will also check off your performance in each category—summarizing your performance in that category:
If you have a hundred-point paper, each one of these categories is worth 20 points. The prof will add up the categories and multiply that number by 4 to get your grade: 4 + 5 + 5 + 4 + 5 = 23 x 4 = 92.
To get an A on this paper, you have to perform with excellence in 3 categories and above average in at least 2 of the other categories.
Now you have a goal. Which three categories are you going to absolutely kill in?
At least one of them—formatting—is a gimmie. All it takes is attention to detail—Microsoft Word has all the tools you need to score perfectly there.
Focus on Development and Body Paragraphs for your other two. They’re simple—almost completely made of a thesis statement and transitions.
Now that you have that figured out, let’s move on to the next step: Crafting a reminder that you can revisit while you write.
4. Writing an Anchor Sentence
It might seem like a silly thing to do, but an anchor sentence is as vital as a thesis statement. It’s essentially a thesis statement for the paper writing process. With this sentence you will remind yourself about what the prof wants and how you’re going to give it to them.
– Summarize the Elements
It’s clear from the highlighting and underlining that the prof wants an argumentative paper that’s well-organized and thoughtful. Note that there is nothing about originality in this rubric.
The prof isn’t asking you to reinvent the wheel or come up with something that will change the field of Linguistics forever—they’re simply asking you to take some important ideas from your linguistics class and apply them to something that you like.
– Understand the Concept
It’s also clear that this prof wants you to synthesize the research in the field of linguistics, not conduct new research.
This goes back to the originality idea—demonstrate you’ve been listening and can apply the concepts of the class to the practices and concepts in another field of study or personal interest.
– Create the Anchor
Now that you have an idea of what’s needed, go ahead and write one or two sentences combining steps 1 and 2:
In this paper, I will demonstrate my understanding of a linguistic concept I learned this semester and how it relates to my field of study. I will demonstrate this knowledge by staying organized, using relevant research, and sticking to my thesis statement.
Yes, it seems a bit silly. But now you have an anchor. If you get stuck while writing, pull out this sentence and see where you’ve gone astray, or where you go to get back on track.
5. Assessing Your Gaps
You know what the prof wants, you know how you’re going to give it to them. Now all you need to know is where it could all fall off the rails. In this step, you name your strengths and weakness so you know exactly where you stand walking in.
It’s super-simple—all you do is answer two questions, making a list of two or three things for each:
- As a writer, I know I’m not so great at… developing a thesis, staying organized, and conducting research.
- As a writer, I know I’m great at… coming up with interesting ideas, articulating my thoughts clearly, and using good grammar.
Simple as that. Now all you need to do is play to those strengths and be cognizant of the weaknesses. You’re ready to move on to the next step, so get to it! Let’s talk about how to execute.
How do I Organize my Research Paper?
1. Sit Down
Ernest Hemingway famously said that “the hardest part about writing is getting your ass in the chair.” And he’s absolutely correct. If you can sit down to write, you’ve got 90% of the work behind you already.
Completing this second step immediately—before you go to bed on the day you get the assignment—is essential to acing this paper.
That said, you should go back to your room, get out your calendar, and start looking at specific pockets of time in your days between when you’re assigned the paper and when the assignment is due.
Follow these tips when making the schedule:
Make the time non-negotiable
It will be tough, but don’t let friends or activities derail your schedule. Set the plan and execute, execute, execute—this is the only way to achieve the results you want.
Be specific about how you spend the time
When making the schedule, set completion goals so that the time isn’t open-ended. If your time is nebulous, you will be more likely to drop the ball. You’ve got a date with a chair and life-long learning.
Commit to the process
Keep in mind that one of the crucial ingredients of successful writing is time. You need time to think, research, and create. If you fail to acknowledge this, you will write a crumby paper every time.
You’re working toward something bigger
It can be easy to fixate on the trees at the expense of seeing the whole forest, so be sure to remember that what you’re doing is adding to your overall career. If the paper is good, you can use it as a writing sample or try to publish it, which will build your résumé. Resist the impulse to think of the paper as a hurdle.
Take advantage of support systems
You’re not writing in a vacuum—you have academic support at your fingertips, as well as friends who are in the same boat. Make an appointment with the writing center to get a semi-professional set of eyes, and had that paper to a friend for quick notes.
2. Get Organized
Your next step is to organize your time. You’re going to fill out an hour or two of work each day, accounting for other classes, social engagements, and priority requirements.
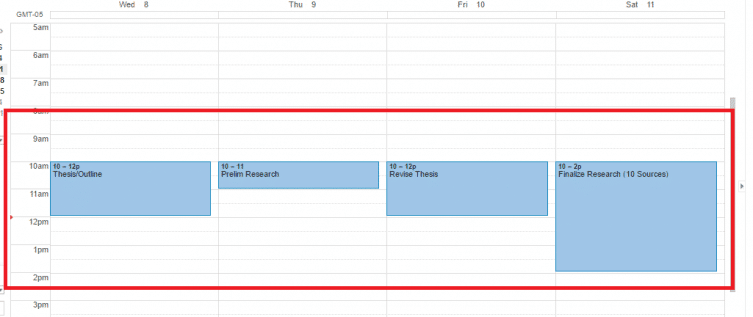
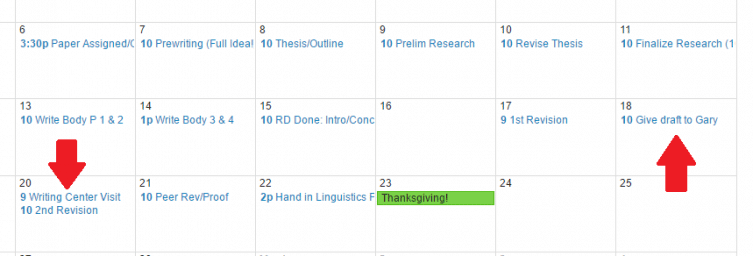
Make a specific tab for your paper, and fill in the times you can work:
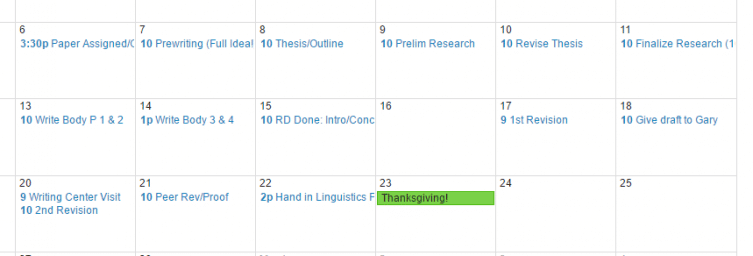
The most important part about this is that you’re specific—setting tangible completion goals for each work session. Most of your sessions should be no more than an hour or two, but some activities—like research—might need to be a bit longer:
If you notice, most of your writing time will be spent on the front end—creating the first draft of the paper. This is because everything after that will be revisionary.
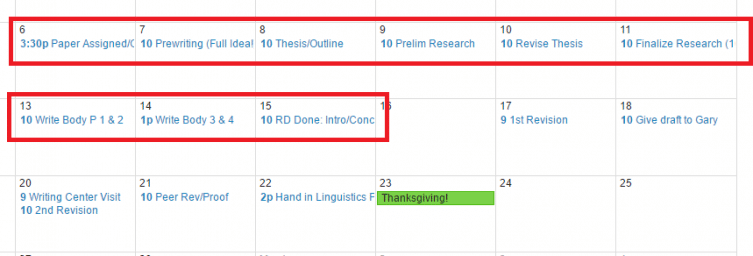
Don’t forget to find your revision buddy, and make an appointment at the writing center!
If you stick to this schedule, you will not only complete your paper on time, you will complete it well. Every writer on the planet will tell you that the schedule is the foundation of good writing—the more time you spend in the chair, the better the writing gets.
How do I Come Up with Ideas for a Paper?
So you’ve completed the first two steps before bed on the day your assigned the paper, now comes the tough stuff. It will, however, be a bit easier now that you know exactly what your prof wants and you’ve got a schedule in place.
To generate ideas, you’ve got a few options. Free writing is often popular, but it can be really time consuming, and also not particularly helpful for research papers. As well, some profs advise talking it out with a friend, which can be distracting.
But you don’t have much time, so you want to focus and narrow your ideas—it’s essential to success. The best method for this is mapping. Mapping is a technique that allows you to freely record your ideas in a logical manner.
Mapping will give you strong guiding questions as well as demonstrate how your ideas are connected, which is super useful for writing a long research paper. Mapping looks something like this:
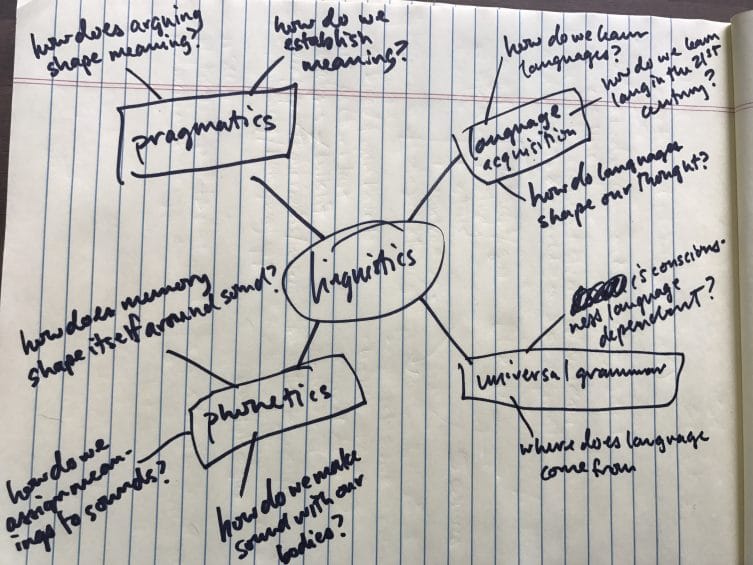
Note that the ideas get more specific the further away they are from the center topic. As well, note that they’re written as interrogatives—questions stimulate thought. Circle the ones that are most specific and uses them for your paper.
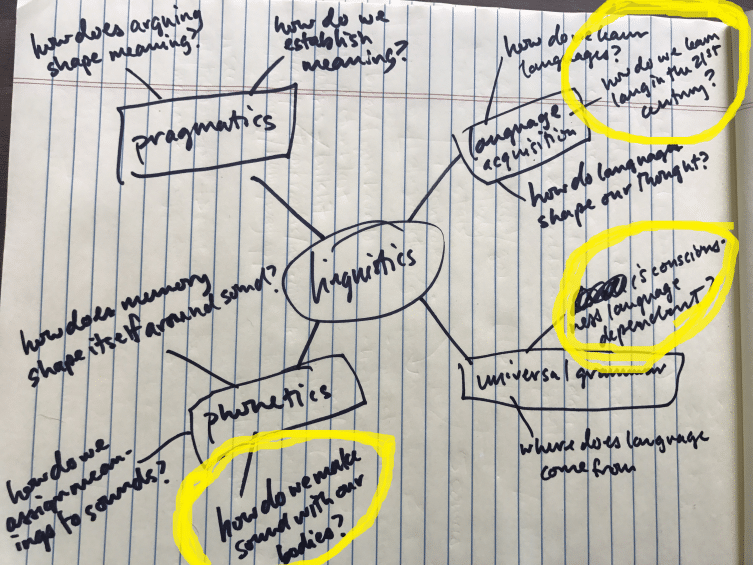
Pro tip: One simple angle that always seems to work is “how is your subject different, altered, or effected by technology and the contemporary trappings of the 21st century?” You can apply this concept to every paper you will write in college.
So, apply your field of study, your interests, or something topical to the subject. Let’s say you’re studying to be a teacher and are interested in ESL students—that’s a lens every topic and question in this list can be examined through. Here are some ideas based upon that…
- Language acquisition: How can new technologies help second language learners learn English faster?
- Pragmatics: How do ESL students understand pragmatics in English contexts?
- Universal Grammar: How does an ESL student learn to transition from one language to another?
- Phonetics: How can ESL students learn English sounds more effectively?
Out of the above, which sounds like it has the most juice? Probably number one. Even without doing any Googling, it seems evident that there will be research in this area that you can draw from. As well, you can rely on non-technical, non-academic observation to give you better ideas—you can use your experience to shape your subject matter. So go with number 1.
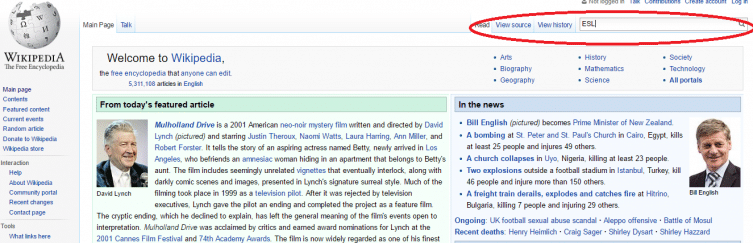
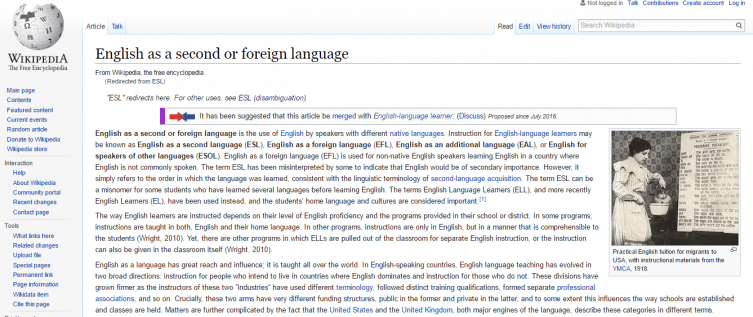
Now, plug the subject into Wikipedia to get an overview of what the subject is.
Ctrl + F to search the page and look for key words, like technology
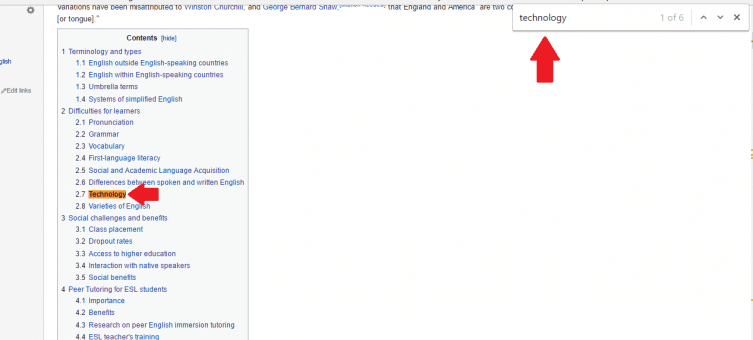
No shock that there’s a whole section on Wikipedia to get you going. Take a look at these specific ideas that you can use in your research phase:
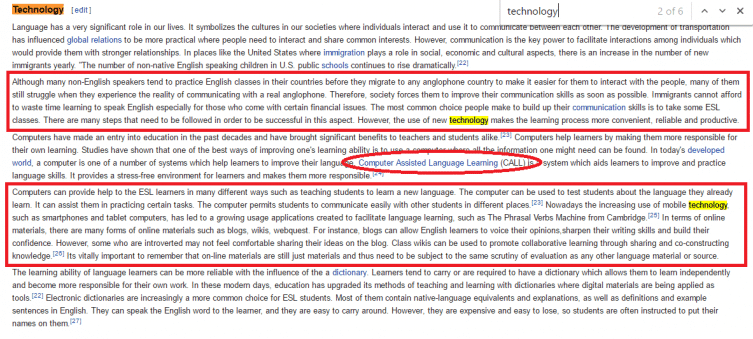
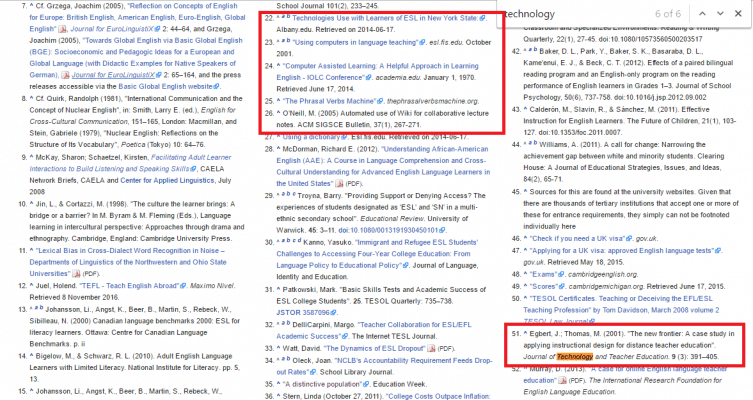
Click the numbered hypertext to see resources. Looks like 23-26 will be helpful:
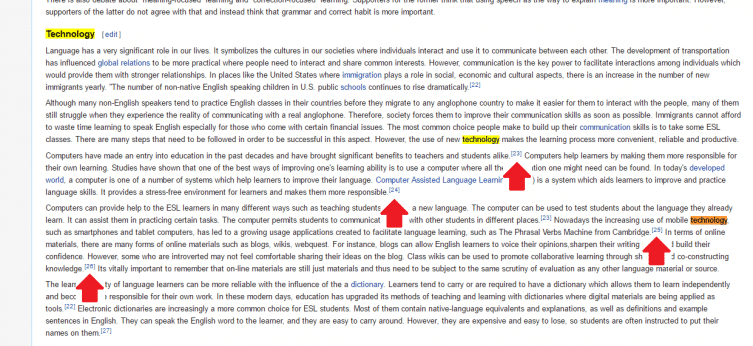
And look, you can scroll to the bottom of the page to get a jump on specific articles to use in your research. As well, 51 mentions your keyword!
Now that you know—on a very general level—what’s happening in the field, you can get going on making your thesis and outline.
How do I Write a Thesis Statement?
With our tutorial on writing a thesis statement, you will see thesis examples, ways to craft a thesis sentence, and how to organize your paper around a thesis statement. First, you’ll need a decent grasp of your topic. Second, you will need specific examples to write about. Third, you will need to organize those three items effectively. And, fourth, you will need to make an outline.
For this step-by-step tutorial of thesis examples, we’re going to break things down for super efficiency so you can create the backbone of the paper.
The writing of the thesis is broken into four parts. Master these and the paper will be a cinch.
1. Creating the Topic Overview
The first step to creating a successful thesis statement is generating a concise overview of the topic at hand. In this case, technology and the ESL classroom is the topic upon which the paper is based. So the first portion of your thesis should be a generalized statement that describes the imperatives which make your paper relevant.
Begin by making a list of why you think your paper topic is relevant. In this case, we could say that…
– technology use inside and outside the classroom has increased in the past decade.
– students use their phones in class, which is a distraction to learning.
– social media interaction is now just as important to most students as face-to-face interaction.
– students are often taken from the expansive digital world outside of the classroom and are bored in a classroom with walls.
– student learning is increasingly social and communal in nature, as opposed to being delivered by an expert.
Now, let’s take those ideas and try to make them into one sentence:
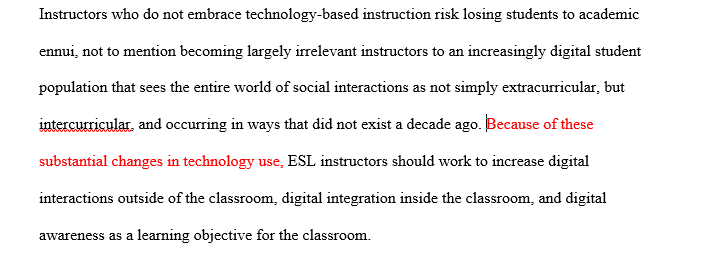
Teachers who refuse to use technology in the classroom are not engaging their students and are disregarding their students’ natural ways of learning and their social needs.
Sounds pretty good, eh? Yep! Now, let’s punch up that language a bit, so we can sound a bit smarter:
Teachers who do not embrace technology in their classes risk losing students to academic boredom, not to mention that they will be perceived by their students as tedious and irrelevant. This is because technology and sociability aren’t extracurricular—students’ lives are increasingly technology oriented and social in nature in ways that weren’t around years ago.
Oh! Even better! But there are still some simple things we can do to punch up the language, like use Word’s synonyms function by right-clicking:
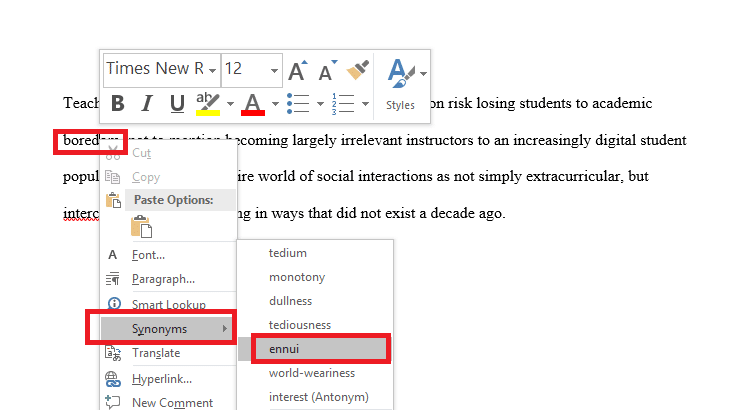
Be careful as you do this—sometimes the tool can be a bit off since it can’t improvise well for word forms. But go through word by word and tighten, change, and you’ll get this:
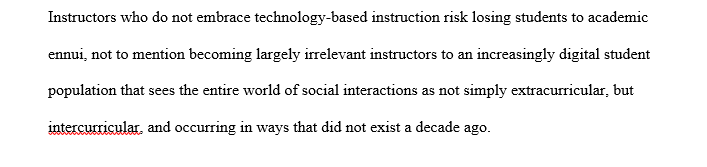
That sounds great, doesn’t it? With adding then subtracting, expanding then consolidating, moving from the general to the specific, you can craft an overview to be used in the thesis. Also, note the use of old tricks, like opposing vocabulary (extracurricular v. intercurricular) which heighten the rhetoric.
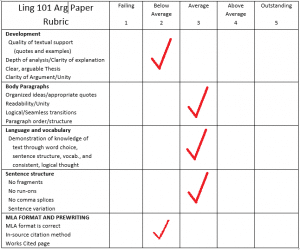
So, check the rubric—did we hit any goals? Yep! See Development, Language and vocabulary, and Sentence structure!
2. Constructing the Specifics
Now that you’ve nailed down the overview, switch gears into getting really narrow. Here, you’re going to identify three solutions to the issue that you presented in the crafting of the overview.
While these things will be more specific than the previous section, they aren’t going to be hyper-specific, but broad enough to act as a reference points for the rest of the paper.
The problem presented was that instructors take away learning tools from students and replace them with less interesting forms of learning and stop social interaction with the classroom. As well, instructors give little attention to technology-based learning tools as an avenue for education.
How can this problem be fixed? Teachers should…
– Leverage technology to get students talking about work when not in class
– Integrate unconventional technologies in class (like iPhones)
– Make technology use a classroom priority
Now, take those things and combine them into a single statement:
ESL instructors should make using technology a priority of education, both inside and outside the classroom.
But, let’s try massage it a bit more, like the last one. Let’s try to keep our triad of ideas intact, that way we can make at least three different sections to the paper:
ESL instructors should try to increase digital interactions between students outside of class, use digital technology inside of class, and make digital avenues of education a learning priority.
Pretty good, but we can make it sound even more academic. Again, use the Word synonym function, and try to bring out the parallel structure even more:

Yeah—that’s great!
3. Crafting the Thesis Sentences
We’re so close to being done with the thesis! All we need now is to connect the two sentences together with some kind of sentence, transitional phrase, or conjunction. In this case (as with almost everything in writing, actually) keep it simple:
Some of you are saying “Hey! Wait a sec! You can’t begin a sentence with because!” In fact, you can. You’ve been lied to if that’s what you think.
Many teachers tell students this because it prevents them from writing incomplete thoughts, or writing sloppily, but it’s totally street legal and, in this case, quite stylish as a prepositional phrase. So use it with abandon, so long as you complete the sentence!
Now, check the rubric again!—clarity of the argument, arguable thesis, and well-organized ideas! Check and check and check! You’re killing it.
You have a thesis!
4. Make an Outline
From there, you can also build your outline, and break up your potential sources, like so:
Introduction/Hook (Engaging anecdote to transition you into the thesis)
Thesis sentences
Part 1 (first portion of the thesis)
– 3-4 sources
Part 2 (second portion of the thesis
– 3-4 sources
Part 3 (third portion of the thesis)
– 3-4 sources
Conclusion/Charge (Wrapping up, charging the reader to make a change)
It’s really just that simple. And, to top it all off, you now have three areas of research to focus on!
Now that we’ve got that square, let’s move on to some techniques for transitioning between ideas.
How do I Create a Transition?
Often students writing long, research-based papers struggle with smoothly connecting the related ideas within the paper. This isn’t uncommon, and—good news—is easily fixed! There are three simple steps. First, you must identify the relationship between the two ideas. Second, you must craft a transition. And, third, you must be careful of potential pitfalls.
1. Determine the Relationship
Let’s say you have this paragraph to open the first section of your Linguistics paper:
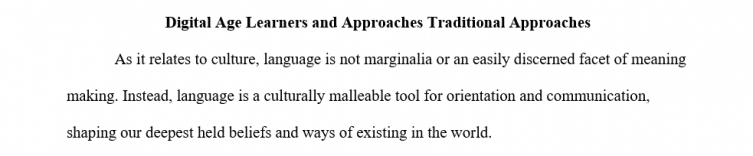
You need to get from that really broad idea to a much simpler idea: that people from different cultures have trouble communicating, or—as it’s written in the paper, this:
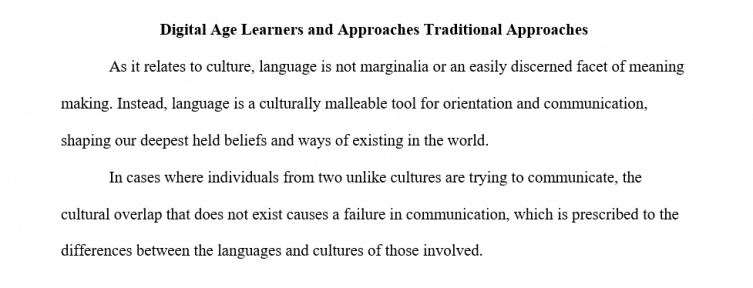
See how jarring the logical jump is from the broad statement to the specific assertion? Take a look at the two statements together, as they are color coded—red being broad, blue being specific:
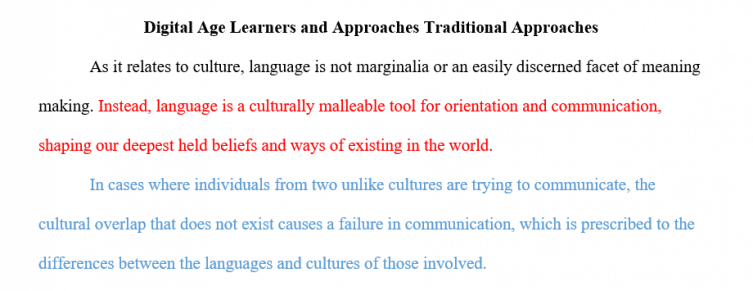
You need something between them to link them logically together and to help the reader make the leap with you, so you’ll need to make a sentence to go between them—one that embodies both the broad and the specific together.
Take a look at this, which logically fills in the gap for the reader, so that the reader doesn’t have to fill in the gaps themselves:
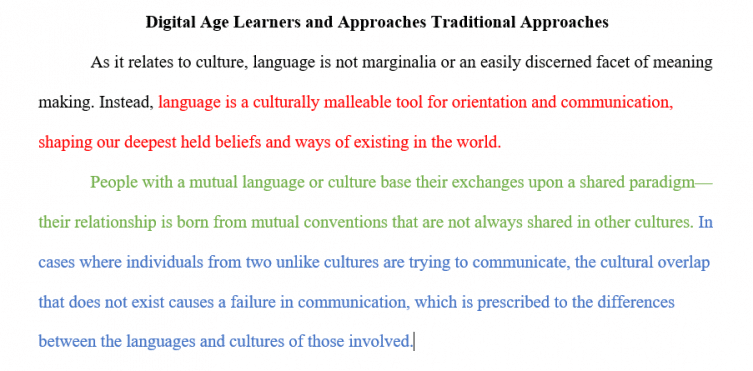
Now give it a read all together:

2. Make the Connections
– The author identified the relationship
It’s clear here that people’s abilities to communicate define their cultural importance. This idea is loosely connected to another idea the author is writing toward—that those unique cultural differences are often the culprit for communication breakdown.
The author sees that the relationship is one of contrasts, so they try to name the contrast to create a connection in the transition—the green text is the merging of contrasts:
– The author crafted the transition
Using a really simple, but subtle writing skill, this author used word choice to make deeper connections between the sentences. See the color coded portions:
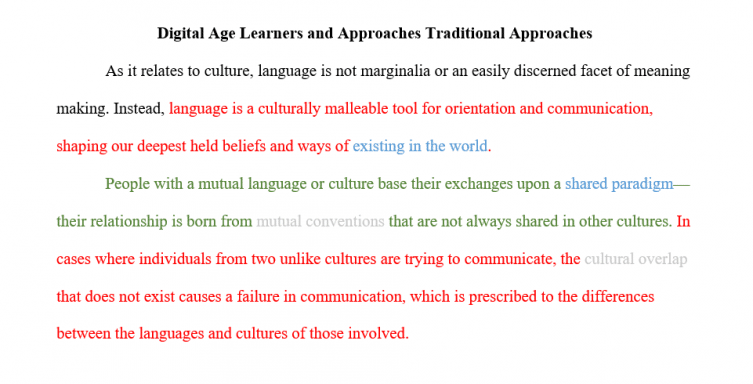
The phrases “existing in the world” and “shared paradigm” mean almost the same thing. As do the phrases “mutual conventions” and “cultural overlap.” The author is essentially re-saying what was just previously stated, but in a more specific way or with different vocabulary. Not how the ideas from each paragraph come together in the transition.
– The author is careful not to fall into traps
In a paper, it’s easy to use simple transition words—therefore, consequently, etc. There is nothing wrong with a transition word here and there, but they are very easy to overuse. Most blogs, like this one, this one, and this one make using transition words an important part of this process.
And it is, sort of, but we’re teaching you how to do this better than average, remember?
You’re trying to ace this paper, which means you have to do a little extra and move past the things that all students can do into things that exceptional students do.
The elegant transition based on nuanced vocabulary is an exceptional student move. Check it against the rubric: readability/unity, logical/seamless transitions, demonstration of knowledge through word choice, vocab, and logical thought—you got it! Bam!
How Do I Edit My Paper?
After you’ve filled in your outline and placed some of your research into your paper, you will have completed first draft. This is more than most students have when they hand in a paper. The editing portion has five steps: First, you revise to tighten and clarify. Second, you edit for grammar, usage, and mechanics. Third, you give a clean copy to a friend and visit academic support. Fourth, you do your final read through to clean things up. And, fifth, recheck the paper against the rubric.
Remember when you were one of those foolish plebes handing in a paper you wrote hours before it was due and hope for an C? Aren’t you glad you know better now?
You’ve finished your preliminary draft and now you need to get it looking sexy for your prof. There are two ways to do this—revising and editing.
– Revising comes first. Revising is when you literally re-vision the piece. You make big changes—fix transitions or pieces research alongside organization and structure.
– Editing comes second. Editing is making small changes to the piece—correcting the grammar, usage, and mechanics, changing the diction to alter the tone a bit.
These terms aren’t interchangeable, though many people make mistakes and use them interchangeably.
Step 1: Revise
After you have finished that paper, it’s important to go back and make large-scale changes. You aren’t going to change the bedrock of the paper—the thesis and the research to go along with it—but you are going to change things that make the paper flow, like smoothing out the transitions, evening out the structure and order of the paragraphs, and make sure all the ideas link together naturally.
This is also a time to add ideas to the basic premise of each section or to eliminate tangents that you may have followed in the heat of the moment. Add what must be added and cut out anything that doesn’t need to be there. Some common things to look for:
– Paragraphs have a logical unfolding order
– Rambling, overly long sentences
– All sections echo back to the thesis
– Appropriate, academic tone
– Engaging to reader
– Claims contain evidence and support
– Transitions are clear
– All ideas are fully developed
– Adding section headings
– Introduction and conclusion serve thesis well
Step 2: Edit
Now that the paper is set, your job is to go through and tighten all the sentences, make changes to word choice (remember Word’s synonym function), and correct and errors in grammar or punctuation that you find. Some common things to look for:
- – Eliminate contractions
- – Comma/semi-colon use
- – Spelling errors
- – Clear pronoun reference
- – Format specific (italics, bolds, etc.)
- – Quotation rules obeyed
- – Apostrophes for plurals and possessives
- – Easily confused words (too, to, and two)
- – Misplaced or dangling modifiers
- – Incomplete sentences
Pro reading tip: While you’re re-reading for your edits, it might be good to move through the paper backwards, that way you can disorient yourself a little and catch more mistakes. Start with the last sentence, then read the second to last sentence, and so on until you get to the first sentence.
Step 3: Review
Next, you’re ready to give this paper to other people for them to examine. First, find a friend you trust and share the paper with them. Next, make an appointment with the campus writing center. With both of these reviews, hand over this set of questions for your reviewers to answer:
- Summarize the main points of this paper in your own words.
- Is the thesis clear and focused, does it fit well with the introduction?
- Is the end of the paper effective? Does it summarize the content well and invite the reader to action?
- Has the argument of the paper been fully addressed?
- Are there any places where the analysis in the paper falls short or is incomplete?
- Are the transitions fluid and succinct? Are there are jarring jumps between ideas?
- Is the research well integrated to the paper? Is there a good balance between my voice and the voices of my sources?
- Do you see any inconsistencies with grammar, usage, or mechanics?
Your reviewer can answer these directly with by talking it out, or offer suggestions by making notes. Once you have this feedback, make the suggested changes you feel make sense.
Step 4: Last Pass
You’ve done so much work and you’re almost complete! You have one more important step: download the Natural Reader Pro app. This app will cost you $10 and is well worth the price. Natural Reader reads documents, PDFs, and websites to you in a range of speeds and voices so that you can hear your paper as it is written, not as you wish it was written.
Print out your paper, fire up Natural Reader, and follow along. Mark any spots that don’t feel right and correct any final mistakes.
Step 5. Check the Rubric
At this point, it might seem like it’s over the top with all the excellent work you just finished. But take one moment to look at the rubric one last time. And the assignment sheet, too.
Ask yourself honestly: Did I fulfill these requirements?
Based on all the work you did above, it’s very unlikely that you didn’t nail the assignment. Unless there are any glaring errors, you’re finished!
Print that sucker out and hand it in! You’re done! Get ready to see a bump in your GPA!
We hope you’ve enjoyed this College Choice tutorial on writing the perfect research paper. Stay tuned for more tutorials on all things related to thriving in college.
Online College Resources
Helping you prepare and gain the most out of your educational experience.